Auto Dialer
Table of Contents
- Overview
- What You Need Before Setting Up Auto Dialer
- Before Setting Up
- How to Set Up an Auto Dialer Campaign
- Activating the Campaign
- Tips & Best Practices
- Auto Dialer – FAQ
Overview
The Auto Dialer in PBX.IM is a smart outbound calling tool that automatically dials phone numbers from a predefined call list. Once a customer picks up, the call is routed to an available agent from the selected queue. This ensures:
- Agents spend more time speaking, less time dialing.
- Calls are managed efficiently 24/7.
- Campaigns can scale without manual intervention.
What You Need Before Setting Up Auto Dialer
Before launching an Auto Dialer campaign, make sure the following elements are in place:
An Active Queue with Assigned Agents
- Navigate to Call Routing > Call Queues.
- Ensure your desired queue exists and has active, logged-in agents.
- Read how to set up Call Queues.
A Configured Time Group
- Navigate to Call Routing > Time Conditions > Time Groups.
- Define your desired calling hours (e.g., 9 AM – 5 PM).
- Read how to set up Time Conditions.
- Important: Time Groups follow your account's local timezone.
- If your account is set to London but you're calling the Los Angeles, convert your preferred LA hours to London time.
- E.g., 9 AM EST → 2 PM BST.
(Optional): A prepared CSV call list in E164 format (Name, Phone, Email, etc.).
E.164 is the international phone number format with a "+" and country code, up to 15 digits, ensuring global uniqueness (e.g., +14155552671)
How to Set Up an Auto Dialer Campaign
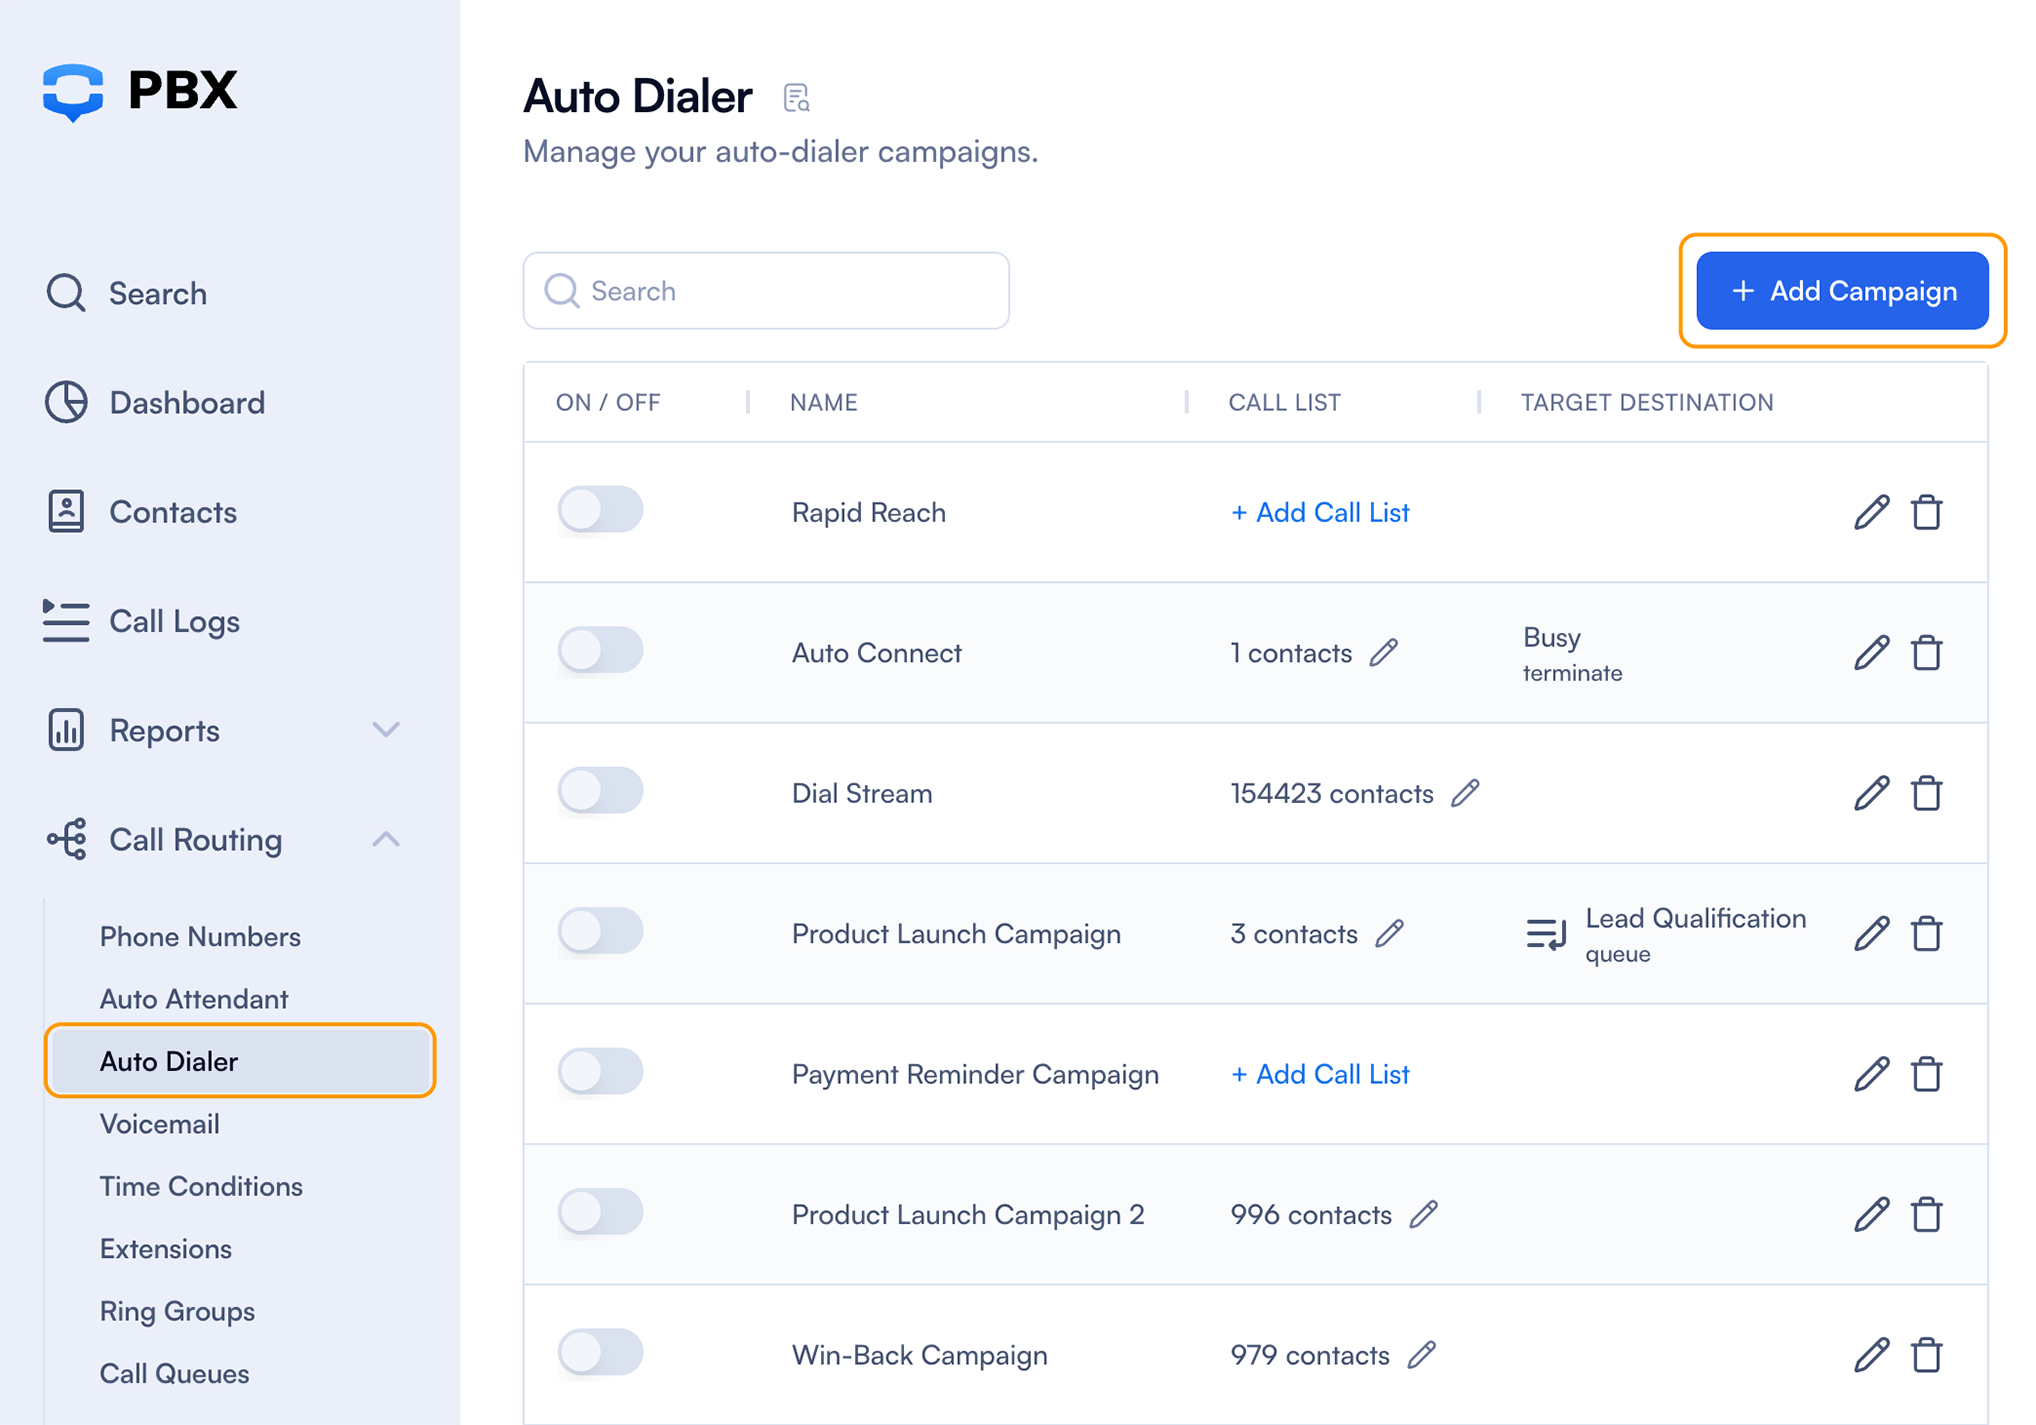
To configure a campaign, go to: Call Routing > Auto Dialer Click on "+ Add Campaign" (Or use the search button in the top left corner and search for "Auto Dialer.")
You'll now see five main configuration tabs:
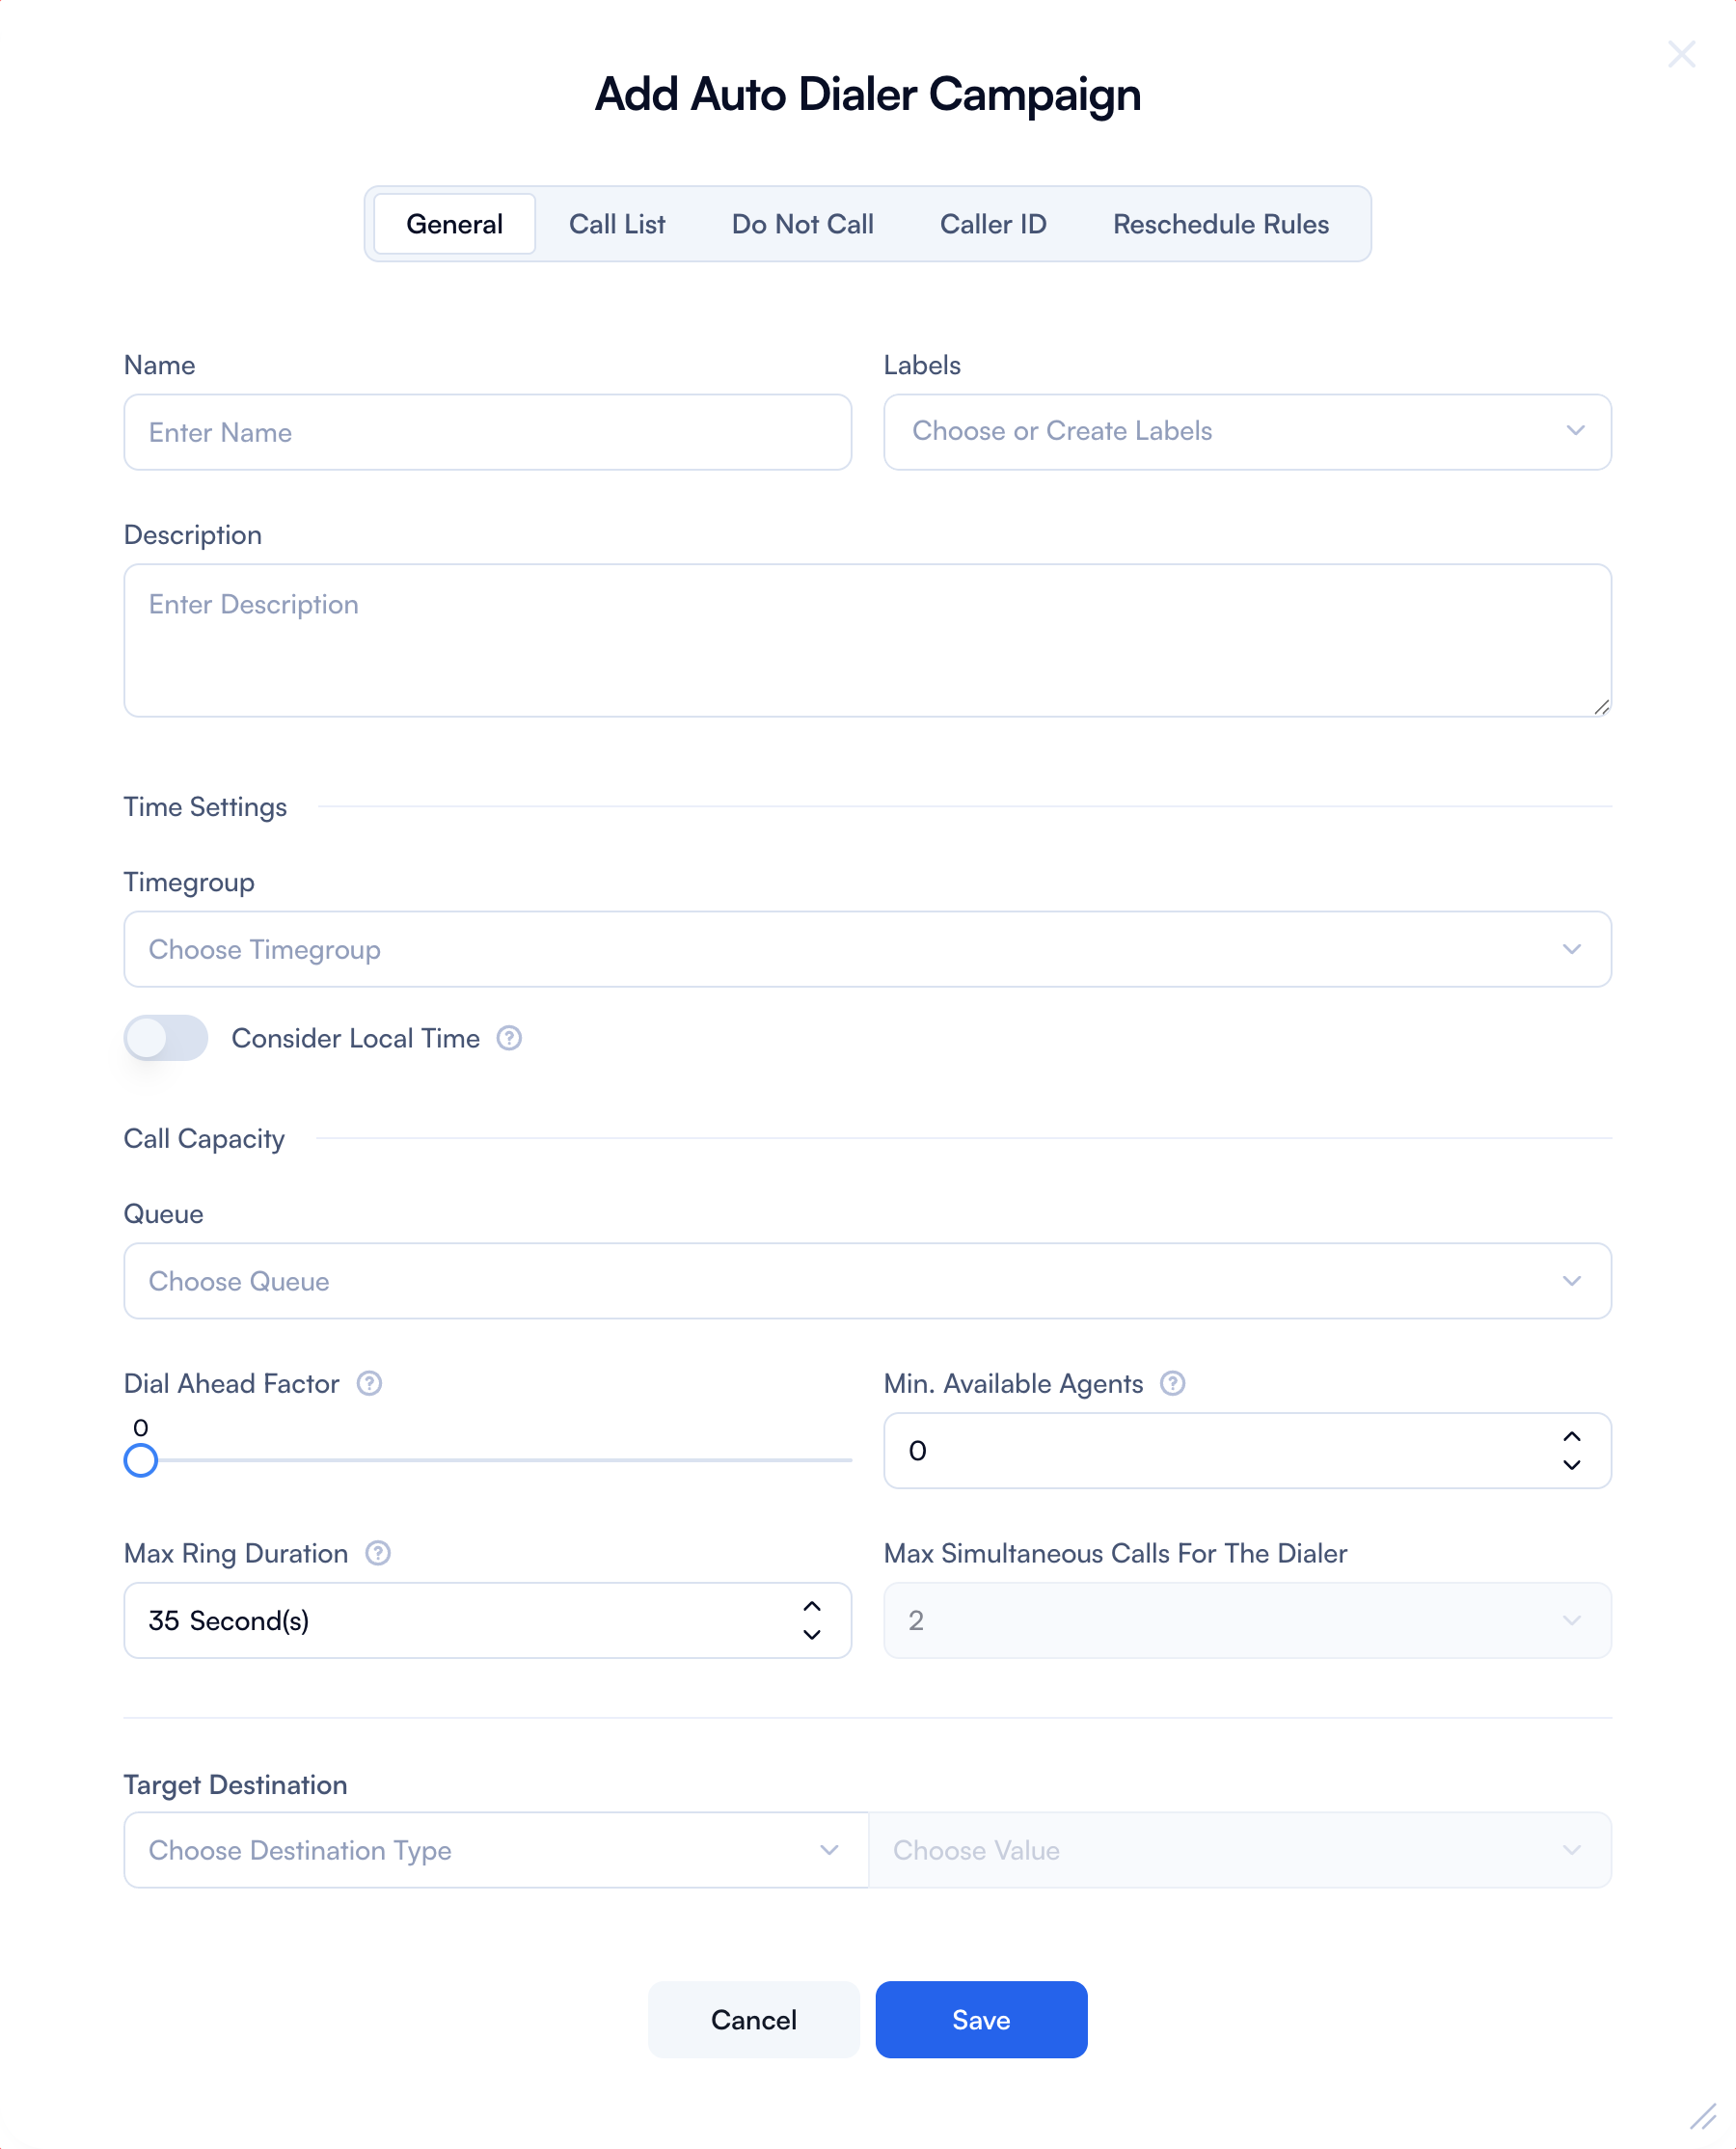
1. General Tab
| Field | Purpose | How to Use | Example |
|---|---|---|---|
| Name | Internal reference for identifying the campaign. | Enter a descriptive name. | US Lead Follow-Up – Q3 |
| Labels | Organize and filter campaigns easily. | Add one or more tags that help with grouping (e.g., Sales, Support, Region). | Sales, France |
| Description | Provides internal context for other admins. | Add extra notes for why this campaign exists or any rules. | Monthly callback to form submissions. |
| Time Group | Restricts calls to specific hours/days. | Select a pre-configured time group (created in Call Routing > Time Groups). | Mon-Fri, 9 AM – 5 PM |
| Consider Local Time (Toggle) | Aligns call time with recipient's timezone. | Enable if you want the system to call customers based on their local time (from number). | ON when calling global audiences. |
| Queue | Triggers outgoing call based on agent availability in the selected queue. | Select the agent queue created earlier. | Support Team – EN |
| Dial-Ahead Factor | Increases call throughput by dialing multiple numbers per agent. | Set 0 for 1:1. Set 1 to dial 2 calls per agent, 2 for 3, etc. Use cautiously. When set to 1, the system triggers 2 outgoing calls per available agent. | 1 → 2 calls per agent |
| Minimum Available Agents | Prevents calls when not enough agents are free. | Enter how many agents must be idle before calls start. | The default is 0. The system starts dialing as soon as the Auto Dialer is turned on. If set to 1, the system waits until 2 agents are available before triggering a call, ensuring at least 1 agent remains free. |
| Max Ring Duration | Avoids long rings and voicemails. | Set how long the system should wait for the customer to answer. | 25 seconds (default) |
| Max Simultaneous Calls | Limits system load and call bursts. | Enter the total number of calls that can happen at once for this campaign. | Default is 2 calls at a time, but this can be increased with paid tiers. |
| Target Destination | Sets the endpoint for answered calls. | Choose where the customer will land (usually a queue or flow). | Support Queue IVR Entry |
Important: You must add at least a name to your campaign; otherwise, it will not be saved.
2. Call List Tab
Uploading Your Call List
- Select the country - this is very important! The default country code is used to validate and convert phone numbers from local format to the international E.164 format. This applies to numbers without a country code in your uploaded list. Incorrect country selection may cause errors.
- Click Upload Local File.
- Select your CSV file.
- System checks for invalid or incorrectly formatted numbers.
- Use the Set Mapping button to assign columns:
- Map Phone Number, Name, Email, etc.
- Example: If your Lead Number field ends up under Name, remap it correctly.
Default Country Code It's always recommended to select a country before uploading your CSV, so PBX.IM can apply the correct international prefix if your numbers aren't in E.164 format.
| Field | Purpose | How to Use | Example |
|---|---|---|---|
| Default Country Code | Helps format numbers properly. | Choose the country the numbers belong to. The system adds missing prefixes if needed. | +1 for US |
| Upload a Local File | Load your contact list into the dialer. | Upload CSV with at least one phone number column. Use UTF-8 encoding. | leads_august.csv |
| Set Mapping | Match CSV fields with dialer fields. | After upload, map each CSV column to the right field (e.g., Phone, Name). If a column name is incorrect or you want to add a new column, you can do so by creating a new variable. (See Dashboard No 4.) | 'Contact' → Phone Number |
| Confirm Import | Finalizes and activates the list. | Click "Import" after mapping and reviewing flagged records. | System flags bad numbers automatically. |
Dashboard No 4: Auto Dialer campaign Setup
Note: If a column name is incorrect or you'd like to add a new one, you can do so by creating a new variable.
Once mapped and validated, click Import & Confirm.
3. Do Not Call Tab
The interface and flow for the Do Not Call (DNC) Tab are very similar to the Call List Tab. You'll upload a CSV file, map fields if needed, and confirm import — but the system uses this list to block outbound calls rather than dial them.
Purpose:
Prevent specific numbers from being contacted, even if they're included in your main call list.
| Field | Purpose | How to Use | Example |
|---|---|---|---|
| Upload File | Prevents calls to specific numbers. | Upload a CSV of opt-outs, internal numbers, or legal DNC entries. | dnc_list.csv |
| Manual Entry | Block specific numbers quickly. | Enter individual phone numbers directly into the DNC list. | +442071231234 |
| Override Existing | Ensures numbers are skipped even if in the call list. | PBX.IM automatically blocks DNC numbers from being dialed. | User exists in both lists → not called |
4. Caller ID Tab
This tab lets you control what number your customers see when the autodialer calls them. You can either choose a default caller ID from your PBX.IM account or go one step further by assigning different numbers for different countries, which can significantly improve answer rates, especially for international campaigns.
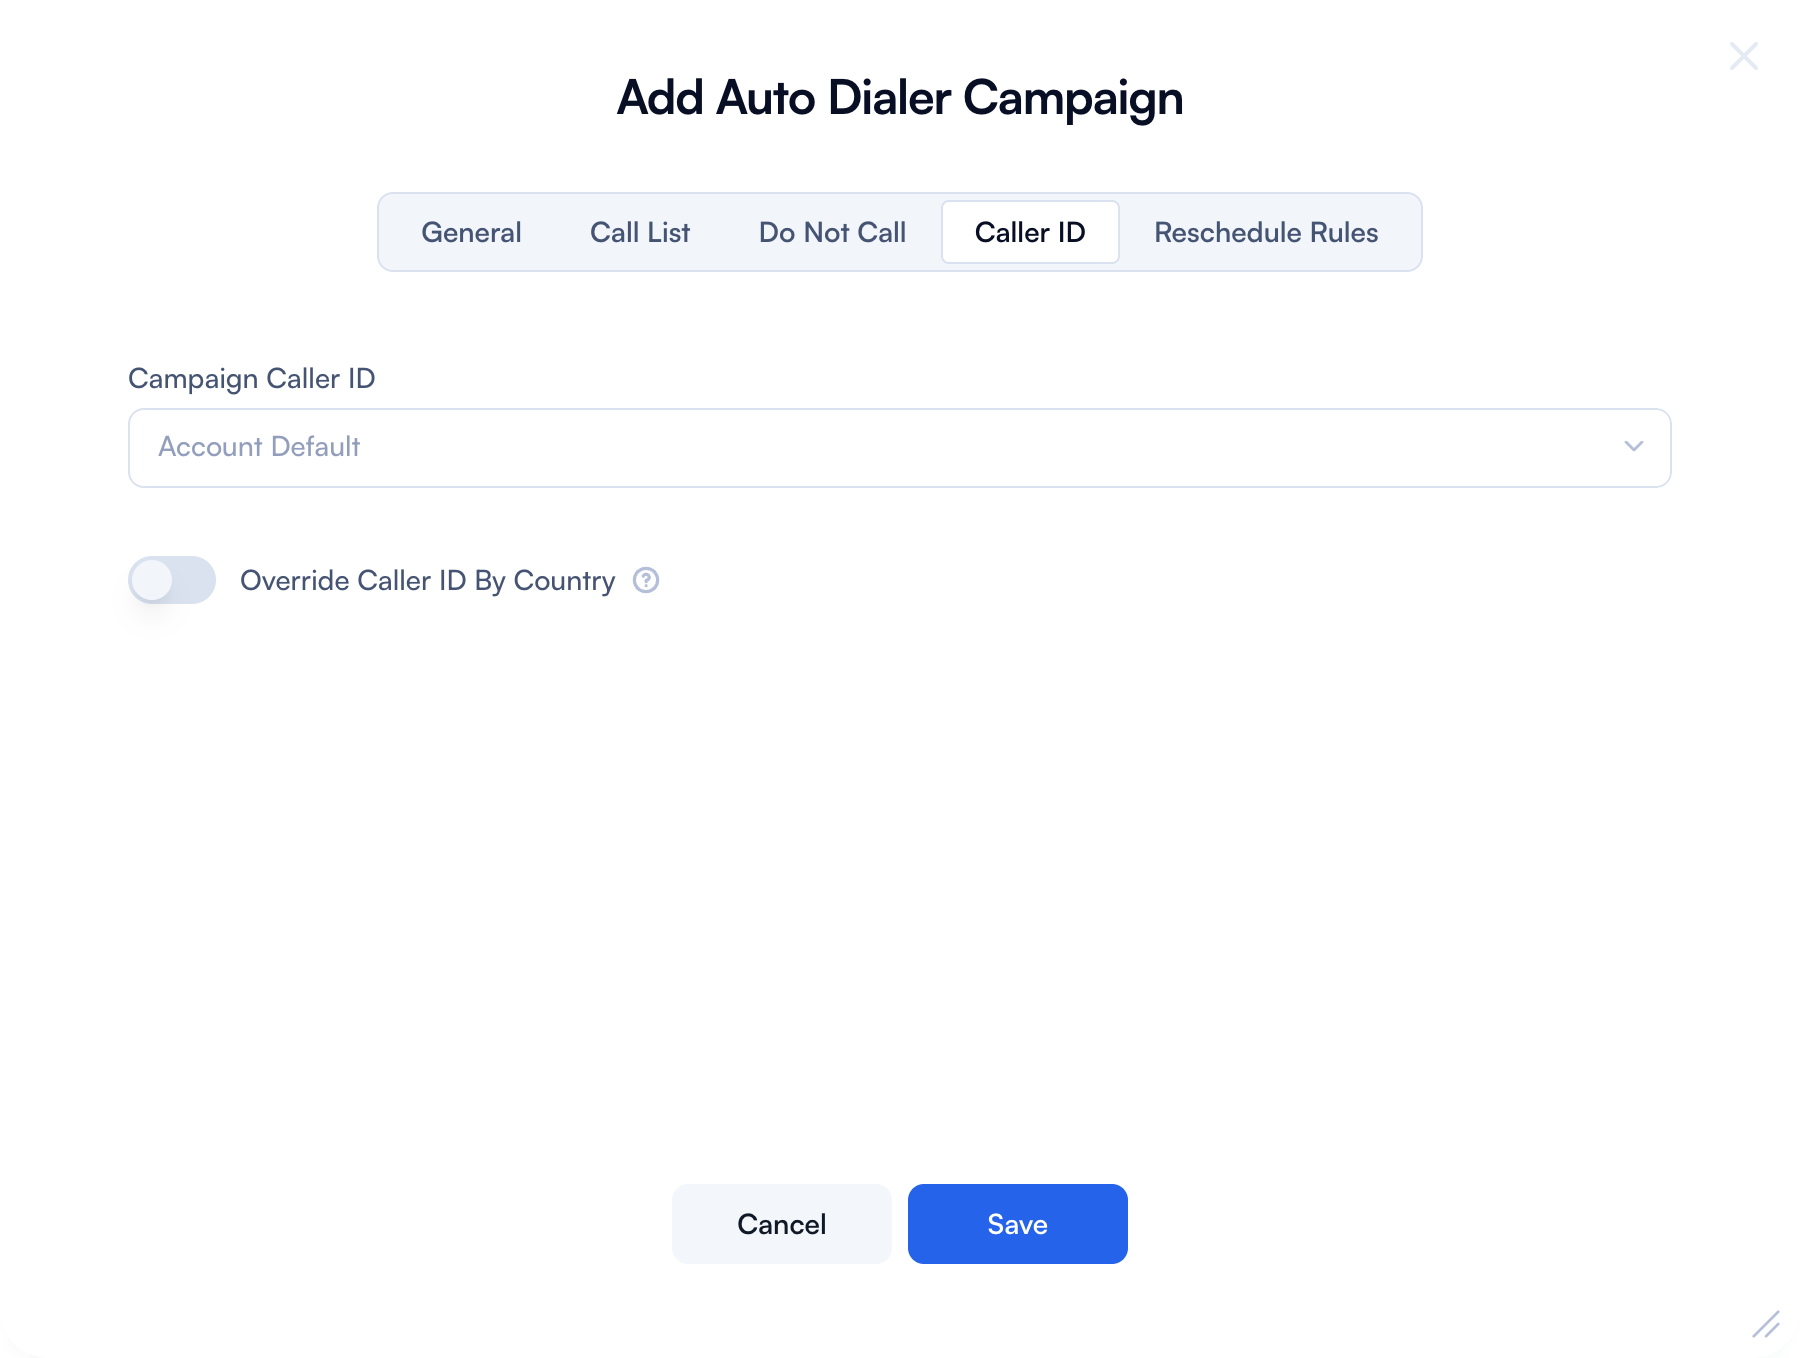
| Field | Description |
|---|---|
| Caller ID Selection | Choose the number to appear on recipients' phones. Pulled from your PBX.IM account. |
| Override by Destination Country | Set specific numbers for calls to particular countries (e.g., use +44 for UK, +33 for France). This increases answer rates. |
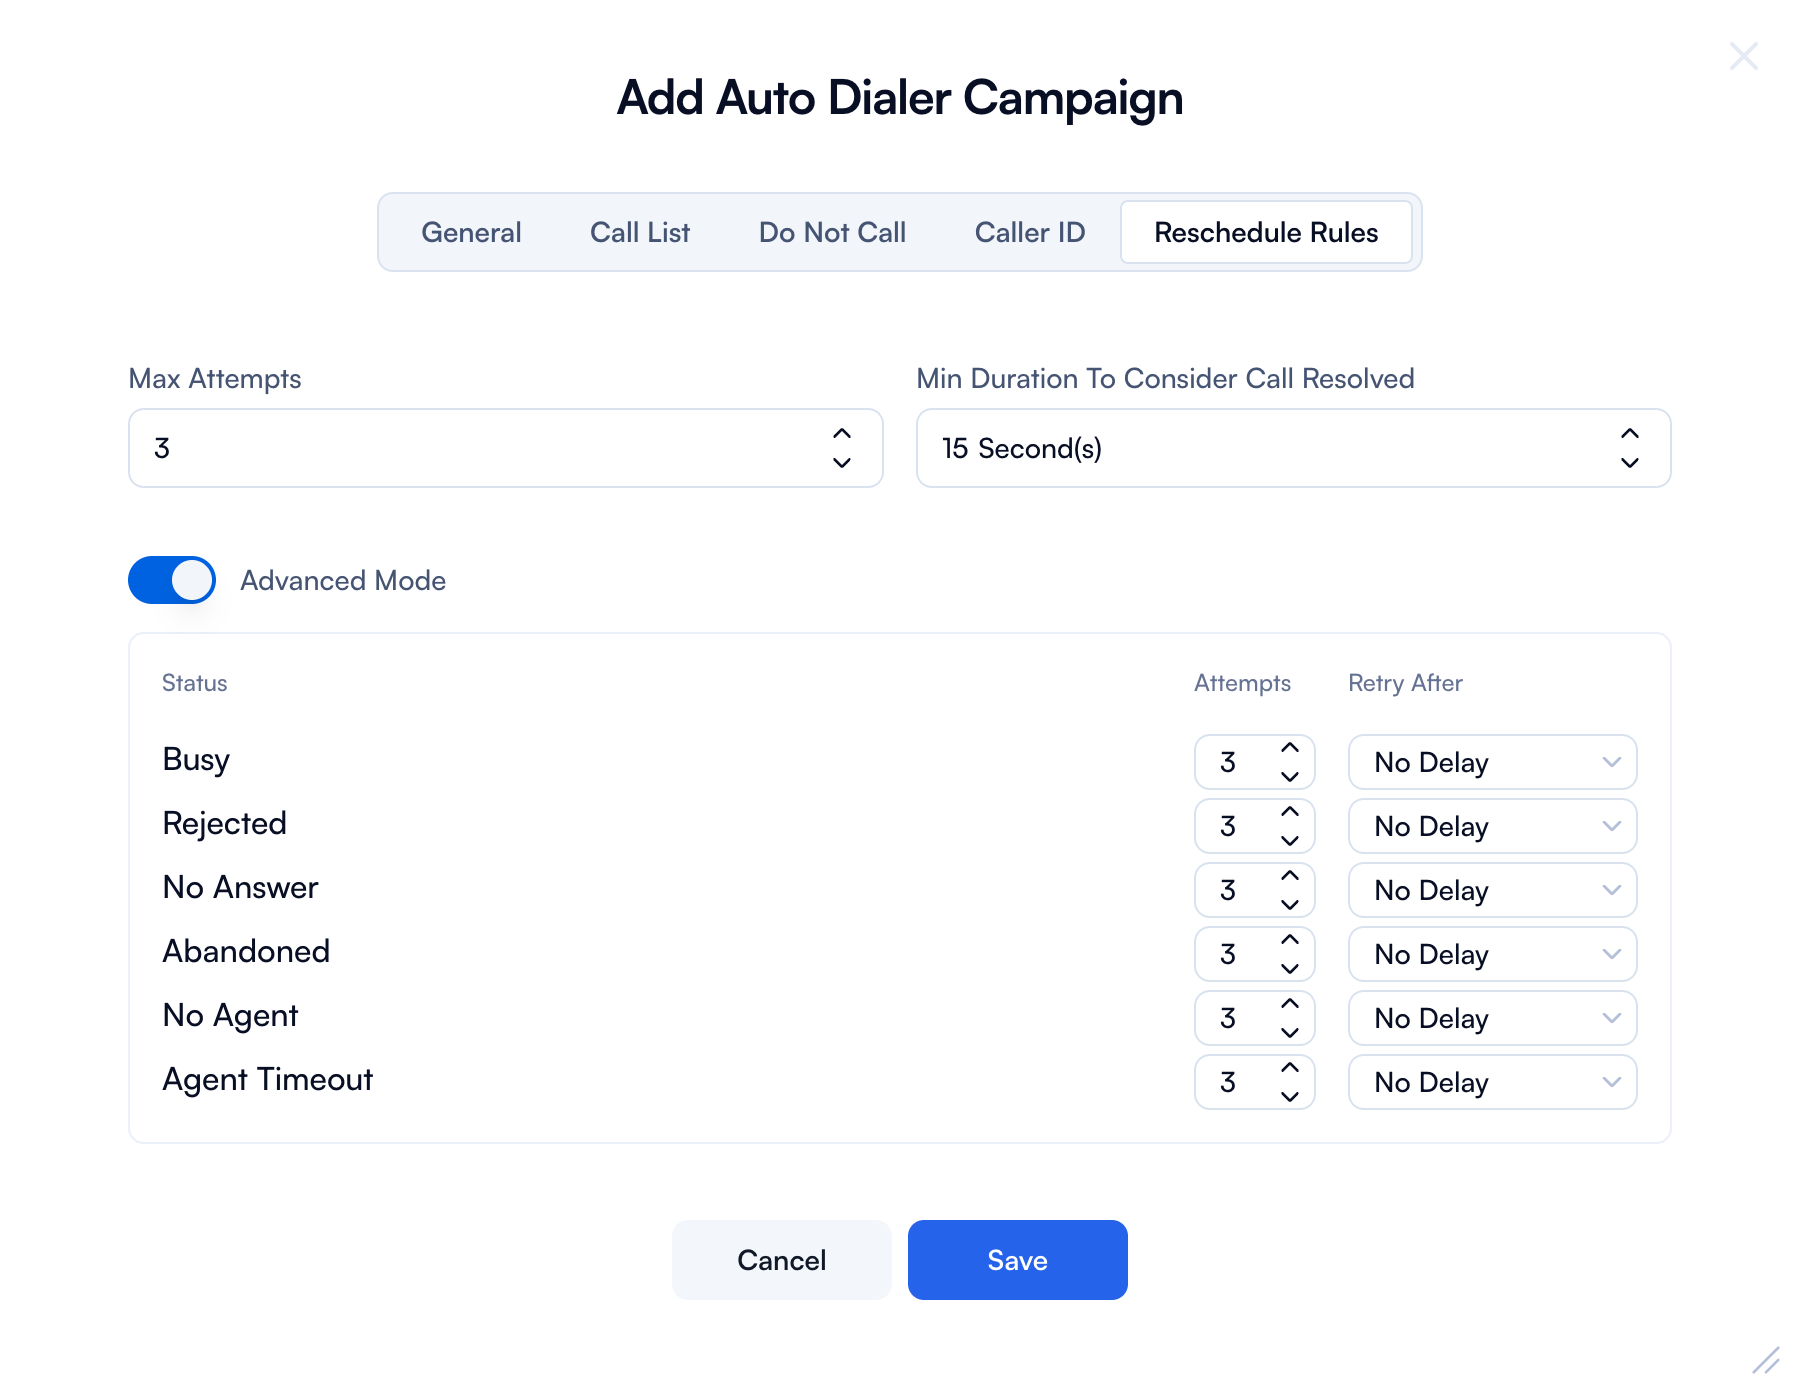
5. Reschedule Rules Tab
Configure how many times the system should retry calling a contact based on the outcome of previous calls. Set limits to control when the dialer stops attempting further calls.
In reschedule rules, by default:
- Max Attempts is set to 3
- Min Duration to Consider Resolved is set to 15 seconds
Definitions:
- Max Attempts refers to how many times an agent will attempt a particular call.
- Min Duration to Consider Resolved refers to the minimum call or conversation time between a human and an agent. For example, if the minimum duration is set to 15 seconds, the call will be considered completed once the agent has had at least a 15-second conversation with the contact.
Important Notes:
- The Max Attempts value defines the upper limit for configuration in Advanced Mode. For example, if you set Max Attempts to 3, you can configure up to 3 individual attempts in the advanced settings. To ensure everything works as expected, align the Max Attempts value with your intended advanced configuration.
- The Retry After option lets you manually define how long the system should wait before the agent makes the next attempt.
Enable Advanced Mode for granular retry configurations per outcome.
5.1 How "Retry After" Works
The "Retry After" dropdown lets you define the time interval between retry attempts when a call doesn't succeed.
For example:
- Call Status: Busy
- Attempts: 3
- Retry After: 1 Hour
In this case, the system will try to call the same contact up to 3 times, with a 1-hour gap between each attempt.
This helps maximize the chances of reaching the contact without overwhelming them or risking blacklisting.
Choose a "Retry After" interval that makes sense for your audience and call strategy.
Activating the Campaign
Once all configurations are complete:
- Review each tab.
- Click Save.
- Toggle ON the campaign from the main Auto Dialer page to start dialing.

Auto Dialer Active Campaign Dashboard - Metrics Explanation
- ON/OFF Indicates whether the campaign is currently active (ON) or inactive (OFF).
- Name The name assigned to the campaign.
- Call List The list of contacts scheduled to be called as part of this campaign.
- Target Destination Refers to the module or endpoint selected within the campaign where calls are routed. This varies based on your configuration. For example, if a user is selected as the target destination, calls will be transferred to that specific user.
- Status Shows the current state of the campaign. For example:
- Completed: Indicates the number of contacts who answered the calls.
- Exhausted: Represents contacts who did not answer, and for whom the maximum number of call attempts has been reached.
- Progress
Displays how many contacts have been "resolved" out of the total call list. A contact is considered resolved if the call was either answered or exhausted. For example, if the progress shows 75 out of 100, it means 75 contacts have been contacted. When you hover over the progress bar, it will also show how many calls were successfully answered and how many were exhausted.
Tips & Best Practices
- Keep Dial-Ahead Factor conservative at first (0 or 1), especially with small teams.
- Monitor unanswered calls – too many may signal incorrect time group or too aggressive dial-ahead settings.
- Use local caller IDs to boost answer rates.
- Maintain and regularly update your Do Not Call list to comply with local regulations.
Auto Dialer – FAQ
1. What happens if a number appears in both the Call List and the Do Not Call list?
The number will be skipped. PBX.IM prioritizes the Do Not Call list and will never dial any number included there, even if it's also in the main call list.
2. How does the "Dial-Ahead Factor" work, and what value should I use?
Dial-Ahead Factor controls how many calls the system makes per available agent.
- 0 means 1 call per available agent.
- 1 means 2 calls per agent, and so on. Start with 0 or 1 to avoid dropped calls and increase only if you have strong agent availability.
3. Can I schedule calls based on the recipient's local time zone?
Yes. Enable the "Consider Local Time" toggle in the General tab. This ensures calls are placed according to the local time of the recipient (based on their number's country code).
4. What file format should I use for uploading call lists or DNC lists?
Use a CSV file encoded in UTF-8. Make sure the file has at least one column with phone numbers. PBX.IM will help you map the fields correctly during upload.
5. What should I do if my calls aren't being placed even though the campaign is active?
Check the following:
- Ensure agents are logged in and available in the selected queue.
- Make sure the Time Group allows calls during that time.
- Confirm the Minimum Available Agents condition is met.
- Check if your call list has valid, mappable numbers.