How to Set Up PBX.IM Auto Attendant & Use Cases
Overview:
The auto attendant feature in PBX.IM functions as an automated virtual receptionist, efficiently managing incoming calls by directing them to the appropriate department or individual without the need for human intervention.
Table of Contents
Introduction to Auto Attendant
Direct inbound callers to the most relevant teams and agents. Customize call routing, waiting times, and messaging to meet your specific needs. Automatically route calls to voicemail outside of business hours, if the line or specific department is busy, or when a call is not answered after a certain number of rings.
Access the Auto Attendant
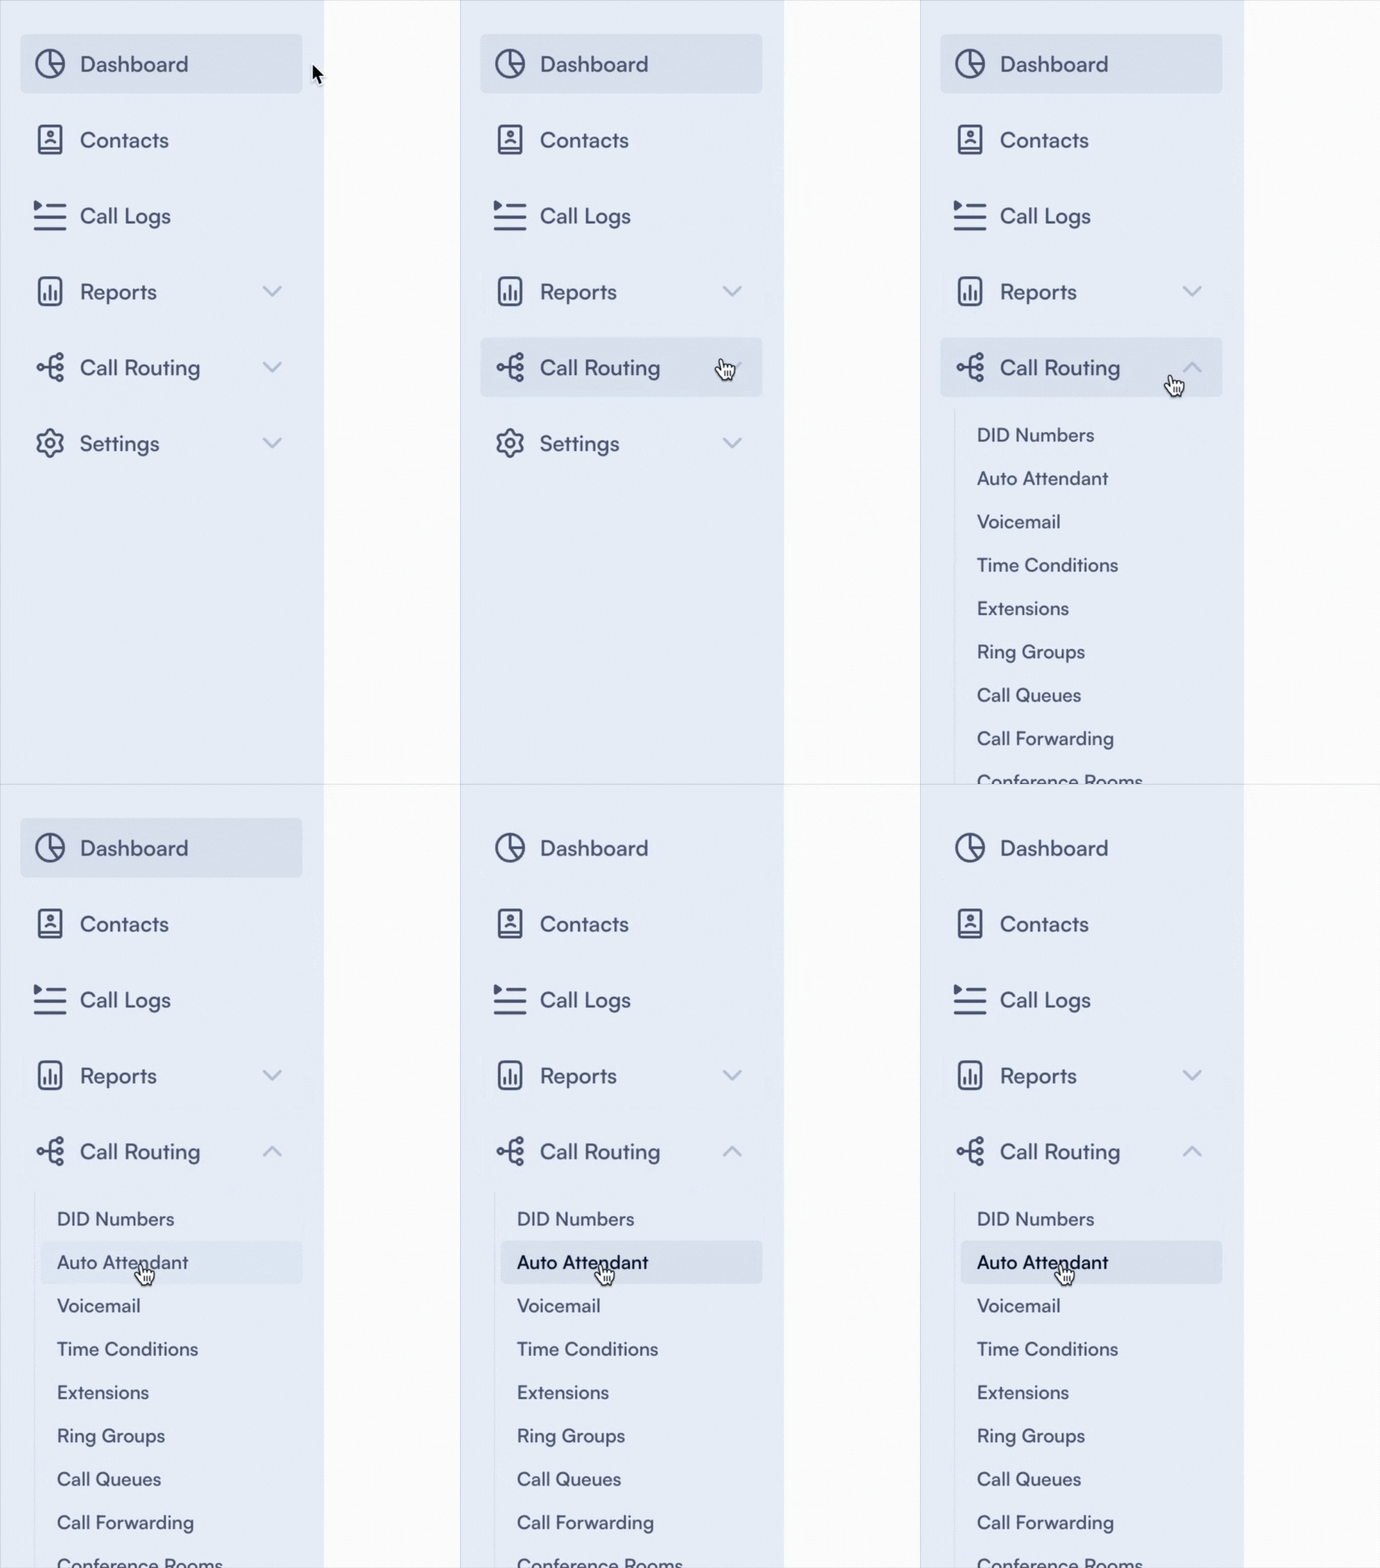
- Log into PBX.IM Dashboard
- Go to ''Call Routing''
- Select ''Auto attendant'' from the drop down menu
Set up an Auto Attendant
Click on ‘’Add Auto Attendant’’

Complete the form by following the next steps:
| Field | Purpose | How to use |
|---|---|---|
| Name | This field is for assigning a name to the Auto attendant configuration. | Give a name that is easy to understand and remember when you want to search for it from the list. |
| Labels | Labels are tags or keywords that can be assigned to the IVR configuration for easier management, sorting, or categorization. | Type in the name that you want and press ENTER. |
| Main Audio | This is where you select the primary greeting or menu prompt audio file that callers will hear first. This will be played only once. | Select from the dropdown menu the audio that best suits your purpose. |
| Replay Audio | Audio that plays repeatedly after the main message, repeating instructions without the welcome message. | Select from the dropdown menu the audio that best suits your purpose. You can choose the same one that you chose under Main Audio or a different one. |
| Invalid Selection Audio | This audio is played when the caller makes an invalid selection, such as pressing a key that doesn’t correspond to any option provided in the IVR menu. | Similar as Main audio and Replay audio you can select the suitable option by clicking on the dropdown menu. |
| Exit Audio | Audio that plays when the caller reaches the limit of options or doesn't input anything, then directs to the exit. | Choose from the dropdown menu what you want your callers to hear when the call is about to be terminated. |
| Max digits | This setting specifies the maximum number of digits that the Auto attendant system will accept for an input. | Press down or up on the arrows to select the maximum number of digits. For example, if set to 4, callers can input a sequence of up to four digits. This is useful for navigating through menus or entering extension numbers. |
| Add delay | This is the delay time added after the caller inputs their selection. | Press down and up on the arrows to select the value. Setting a delay of 5 seconds, for example, gives the system time to process the input before moving to the next step or action. |
| No input wait time | This setting defines how long the system will wait for an input from the caller before prompting for the next action. | Press down and up on the arrows to select the value (1-99 seconds). For example: if set to 3 seconds, the auto attendant will wait three seconds for the caller to make a selection before playing the "Invalid Selection Audio" or prompting again. |
| Max failures | This indicates the maximum number of times a caller can fail to make a valid input before being directed to the exit destination. | Press down and up on the arrows to select the value. |
| No input max | Similar to "Max Failures," this setting limits the number of times a caller can fail to make any input at all. If this limit is reached, a default action is triggered. | Press down and up on the arrows to select the value. |
| Exit destination type | This dropdown allows you to select the type of action or destination the call should be routed to upon an exit condition being met (like reaching the maximum number of input failures). | Choose from the dropdown menu: User, Time Condition, Endpoint, Queue, Announcement, Forward, IVR, Voicemail, Ring Group, or Conference. |
| Exit Destination | This option determines where calls are routed if they are not answered after the specified timeout period. After the Auto Attendant goes through its menu options, the call will ring a designated queue for a certain amount of time (e.g., 2 minutes). If no one answers the call within that time, the call will be routed to the Exit Destination. | Depends on the destination type selection. |
Direct extensions
| Type | Purpose | How to use |
|---|---|---|
| Enabled Direct Dial | This checkbox allows you to enable or disable the direct dial feature. | Enable the option when you want your callers to directly reach specific extensions without navigating through the entire auto attendant menu. This is particularly useful for returning callers or those who know exactly which department or person they need to contact. Leave it unchecked when you don't want this option available. |
| Available Extensions | This section lists all extensions that can be set up for direct dialing. Each entry shows: Extension Number, Description, and a Plus Icon to add extensions to the allowed list. | Search after the extension name and click + to select the one you want. |
| Allowed Extensions | This section displays which extensions are currently set up and permitted for direct dial. | If you want to delete an entry from this table press on X from the right side near the extension name. |
All the changes you make in the fields above will be displayed on the main Auto Attendant screen.
Here you can see:
| Type | How to use it |
|---|---|
| Search Bar | This allows you to quickly search through the list of auto attendant configurations using keywords. It’s useful for locating specific auto attendant setups when multiple are in use. |
| Labels | From the dropdown menu choose the label you want to use to filter the information. |
| The table | A summary of all data from General and Direct Extensions tabs. Columns: Name (configuration names), Labels (assigned labels), Main audio (primary greeting audio), Replay audio (audio for menu replay), Invalid audio (audio for invalid selections), Exit audio (audio when interaction ends). |
When you want to edit or delete an entry, simply go to the main Auto Attendant page and click on the ✏️ Edit or Delete button.
Common use cases
Medical Clinic
- Scenario: You run a busy medical clinic that receives calls throughout the day from patients looking to book appointments, request prescription refills, or seek medical advice. Handling these calls can be challenging, especially during peak hours when staff availability is limited.
- Solution: By utilizing an auto attendant feature, your clinic can effectively triage incoming calls based on urgency and purpose. Patients can choose from predefined options, such as booking appointments, speaking with a nurse, or pharmacy services, ensuring they are connected to the right department quickly. This system reduces hold times and improves the efficiency of patient care services.
Real Estate Agency
- Scenario: As a real estate agency, you receive numerous calls from potential buyers, sellers, and tenants. These calls need to be directed to different agents or departments based on the caller's needs, such as property inquiries or existing contract discussions.
- Solution: An auto attendant system can streamline call management by offering callers a menu to choose the nature of their inquiry—whether it's property listings, customer support, or agent contact. This ensures that each caller is routed to the appropriate agent who can handle their specific requirements, enhancing service responsiveness and client satisfaction.
Educational Institution
- Scenario: Your educational institution handles a variety of inquiries from students, parents, and staff regarding admissions, schedules, and administrative matters. The volume and diversity of calls can overwhelm direct lines, especially during enrollment and exam periods.
- Solution: Implementing an auto attendant helps manage these calls by directing callers to the right department—be it admissions, finance, or student support. The system can also provide information directly through recorded messages for frequently asked questions, reducing the need for direct interaction and allowing staff to focus on more complex queries.
Small Business
- Scenario: As a small business with a lean team, managing incoming calls while attending to other critical business operations can be challenging. Calls may include new client inquiries, service requests, or supplier communications.
- Solution: An auto attendant system is ideal for small businesses looking to project a professional image while efficiently managing incoming calls. Callers can select from options such as sales, support, or accounts, ensuring they are connected to the right person quickly. This system helps prevent missed calls and supports better time management by the team.